Thursday, December 22, 2011

R.I.P. Bill Martin (1930-2011)

This is the last picture I have of my father and me. It was taken in Richmond this past summer.


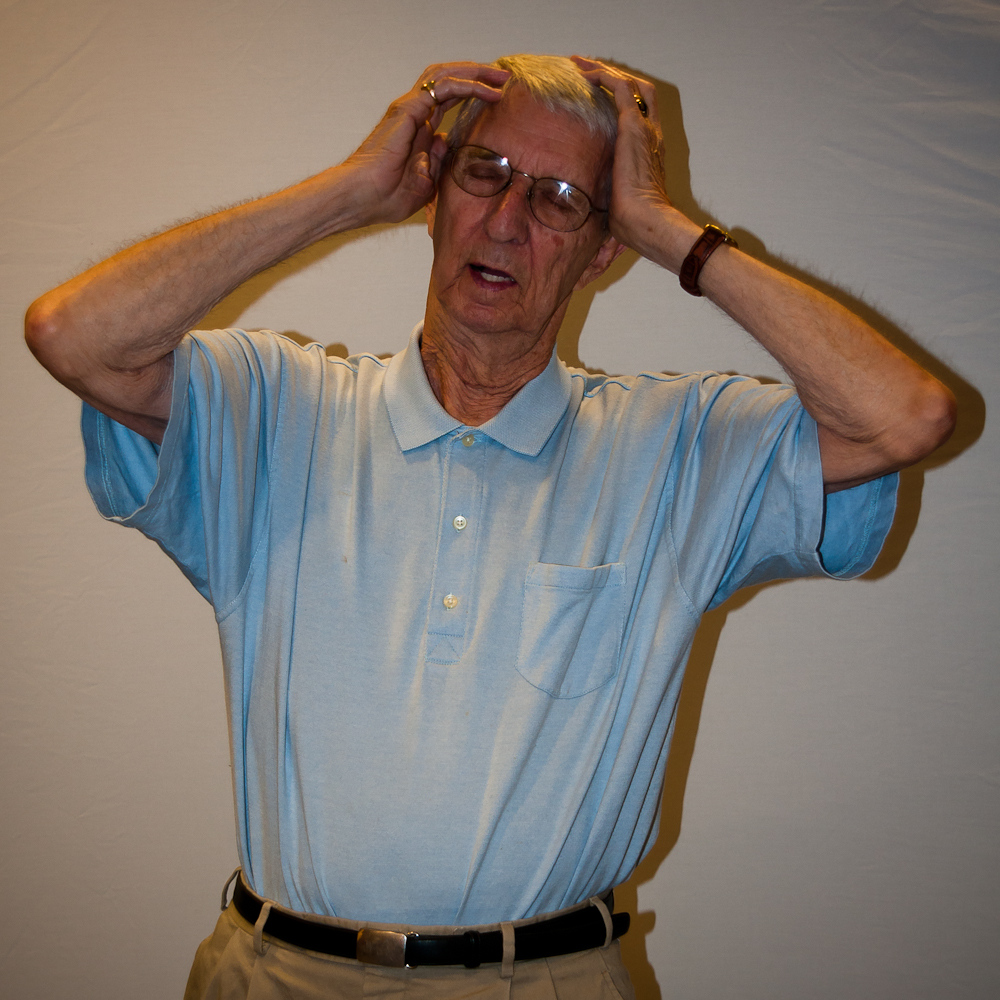
Two years ago, after having shown signs of dementia for a couple of years, he posed for me in a photo studio in Richmond. He had on the same shirt that day, too! He was a real actor at heart. Even though he didn't make a whole lot of sense when he spoke back in 2009, he still had his sense of humor and charisma, as he did nearly to the end.


A few days prior to this session, I read some selections from his "stories". I published these wonderful stories from his childhood as Billy: Stories of my childhood and have done several readings of them in Germany and in the US. Here are a couple of photos from the reading.

My father and I with his second wife, Patti, at Book People, a local book store that helped organize the event.
My father at the reading after signing copies of his book.
The reading took place in the chapel at St. Christopher's School in Richmond, where he worked during the 1980s.


He was still lucid enough to be able to sign his name.

We all enjoyed the dinner afterward.

SOOC with the A77

As I've written before, the Sony A77 can do some interesting things in-camera. While my photog friends are bending their backs over their tripods while taking seven-picture sequences for their HDR picture, I just press the shutter and my camera does all the work for me. No extra software needed! There are certainly differences in quality, but for a quick shot where you know there are going to be strong contrasts, this setting (which can be changed to Lo, Med, or High) is handy.


The medium setting makes for a nice, sharp, vivid, realistic looking picture.


The next two pictures - also taken with the HDR setting - give you an example of how you can provide more information in your pictures while still capturing the main scene.


With my camera still "stuck" in HDR mode, a peacock showed its glorious tail feathers, so my first snap was in that mode. Good thing he wasn't moving or there would have been some ghosting in the picture as the shutter clicked again and again. The shutter is very fast, but so is a scared peacock! The in-camera processing of an HDR picture takes about eleven seconds, so you really only have one shot at a bird (as you would, were you firing a rifle).


I was fiddling with the "picture effects" button and landed on "miniature scene", which blurs certain areas of the picture. As the peacock turned and headed up the hill, I got this shot of his behind. The miniature scene setting also adds a bit of vibrancy to the picture, which is nice here.


Here's another example of a scene where there were strong contrasts, so I zapped back into HDR mode.


There are two HDR programs on the A77. One is a picture effect that takes three shots and creates an "HDR painting" with enhanced details. That's what you see above. The other possibility is more along the lines of the real HDR process: three pictures are taken, whereby you can set the plus/minus exposure settings of the first and third shots (up to +/- 6 EV). Chosen wisely for the appropriate amount of contrast in the picture, this setting gives you a more natural looking HDR, as in the following. Using this setting, you need to be aware that the shutter speed will be slowed down on the third shot, so your subject should not move.


Again, as a point of reference, here is nearly the same shot with the HDR painting setting. The shutter does not drag for the third shot, so if your little girl is walking up the steps, she'll still be in focus:

Monday, December 19, 2011

Mondrian and photographic composition

As a young high school yearbook editor in the 1970s, I learned to make layouts based on the style of art created by the Dutch artist Piet Mondrian. I had never heard of him before, but soon learned to appreciate the interplay between vertical and horizontal lines. My mentor Jim Palik taught me that in composition vertical lines create tension and horizontal ones create a relaxing effect in the viewer. Put the two together and you have an interesting composition. In music you might say that's how Schubert created interesting compositions by modulating between major and minor keys in interesting ways.
My photographic eye has been trained to take notice of  Mondrianic patterns and these horizontal/vertical compositions.


The ugly building next to our grocery store is a motorcycle supply store. From the side, however, it is fairly interesting. Whether horizontal - like the layout of a book - or vertical, the eye whizzes along the lines, looking for a place to rest. The door and window here provide focal points for the wandering eye.


Even without Holland's national color in the scene, the opposition between vertical and horizontal lines - together with the organic line of evaporating rainwater at the bottom - creates an interesting, if minimalistic, composition. One might be tempted to think of the architecture in a Japanese zen garden.


After going out to capture beautiful bokehs at the Christmas market in Stuttgart last week, I was on a photographic high, having trained my eye for a couple of hours to pay attention to the background in the photograph. This picture came out of that stroll:


Of course, this is completely different, and yet my yearbook training also taught me that there has to be a dominant element on each double-page spread. A photograph or painting should also have something that grabs the viewers' eye, giving it a starting point before wandering across the rest of the canvas.
As I was waiting for the tram to take me home after that trip to the Christmas market, my camera was still hungry. As if knowing that my color-sated eyes needed a rest, it led me to a seemingly boring corner of the underground. As a father who is often on the go with a child in a stroller, I am familiar with the elevators in town. However, I had never thought of them as being worthy of a picture. On that evening I did.


The partitioning of the rectangle into strips of gray tones is soothing. Turn one on the side and you have something like a Rothko.


Rothko's work provided inspiration for the following composition of gradations, too - or at least my appreciation for this picture is strengthened by my appreciation for his work.

Sony A77, Minolta 50mm, f3.5, ISO 400, 1/640 sec.
One more picture seems to fit into the grouping, though it was taken above ground and consists mainly of vertical lines. Yesterday at the zoo the sky was overcast but all at once a beam of sun hit these columns and gave me a million-dollar lighting effect! The rose bush in the corner gives the eye a place to start. I just love the smooth gradations of light and hues in this! I'm fairly easy to please!


Thursday, December 15, 2011

Tips for photographing at the zoo

Stuttgart's Zoological and Botanical Gardens


Sun may be fun, but a gray day is in many ways prime time for visiting the zoo. No crowds to block your view or rush you along, so you can see everything at your leisure. Nevertheless, some animals are difficult to photograph. In the winter the ostriches are in a glass house and the giraffes are inside behind bars, so it's hard to get the whole animal in one picture. What to do?


Concentrate on the details. Pull out your telephoto lens - if you don't have it on already - and look for interesting parts of animals. You could even put together a collection of the animals' noses/snouts/ trunks/beaks! Or their ears. Or their eyes. Use your imagination!

Another type of animal that is difficult to photograph are the fish. The aquarium is very dark and the glass is often smeared by all the kids who have tried to get nose-to-nose with the sharks.


So pump up your ISO and look for a clean spot on the window (or clean it off with your sleeve). It is also helpful to put your lens (without the hood) right up to the glass so you don't get your reflection in the picture. Don't worry about hunting for the fish; they'll eventually swim right by you. Keep your finger on the shutter button and click away. It helps to keep your other eye open so you can anticipate when an interesting fish might swim by. An open aperture will allow you to use a faster shutter speed. This technique may also result in interesting shots you might not have composed otherwise.


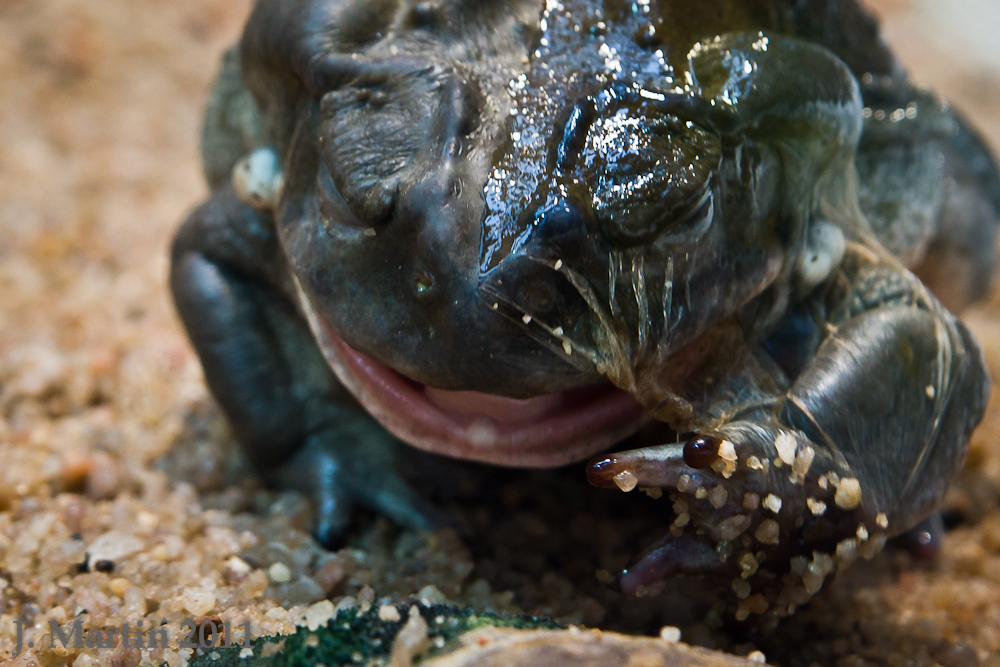
Even the animals you might consider less interesting - because they aren't as exotic - can fascinate you by doing unusual things. This toad seems to be shedding its skin. It was pulling off a layer of slime and eating it bit by bit. Maybe it was an 8-year-old male. They've been known to do that, too.


I love photographing the pelicans. They glide through the water so gracefully and they are much larger than you would think. At the Wilhelma there are always several of them in the reflecting pool near the seas lions. Again, sometimes a detail makes for an interesting picture. The background here doesn't take the viewer's eye away from the main subject but somehow adds to the picture because it looks somewhat feathery, underlining the pelican's texture.


Or you may opt for more of the animal. They do have wonderfully beautiful feathers and magnificently strong wings.


At the other end of the pool is a 150-year-old building that serves as a beautiful backdrop, in this case to a cormorant plucking at itself.


Finally, when you run into areas of the zoo where there are flocks of birds or lots of animals in a herd, you may find it difficult to pick one out of the pack. There are a couple of ways you can attack this problem. Use a very shallow depth of field and then wait until one animal gives you its best pose while the others are not posing:


Or you can shoot into the middle and hope that the composition ends up being attractive enough to make the resulting photograph interesting. Here I think the heron in the foreground adds an nice touch, as does the black space in the middle:


On the edges of the flock or pack or herd you might also be able to isolate a couple of animals in an interesting pose.


What tips would you add to this list?

Tuesday, December 6, 2011

New Firmware for Sony A77 and A65

When is an update really an update?


Tuesday, November 29, 2011, arrived for me with nearly as much anticipation as did October 21, 2011. The latter was the date I purchased my Sony A77 and the former was the release date for the (much needed) firmware update. The Sony user community had already compiled lists of firmware wishes even before the camera was available, these wishes being based on the preceding model, the A700. Then users of the new camera began noticing bugs that they thought should be removed with a new firmware update.
Firmware is the software of the camera. If you've ever re-installed the operating system on your computer, you know how scary it can be to lose all your files if you mess things up. With horror stories coursing through the internet about camera crashes (they wouldn't function after a certain sequence of buttons had been accidentally pressed), I was not the only one who was afraid to upgrade after the new firmware 1.04 was made available. Some brave (?) souls had already downloaded it from a Chinese server (!) and reported that it worked fine. Some software experts in the forums confirmed that the two versions were indeed identical. As for me, the promise of improvements in performance (for free!) outweighed my fear.

1600 ISO with Firmware version 1.04
When normal consumers speak of improvements in software or firmware, we project a lot of hope onto the software engineers, some of whom had, in this case, certainly been informed of the users' update desires. However, I imagine that many of the desired update functions could not be simply tweaked into the existing software. As anyone knows who has ever looked at a piece of computer programming, software is very detailed and cannot always be improved without running the risk of creating bugs elsewhere. Compromises must be made until a big update is made.
Here are the improvements that were supposed to be made, according to an official in the German Club Sonus:
1. Better response time when changing the settings using the (front and) rear control dials.
2. Improvement of the lighting using ADI flash mode.
3. Improvement of the MR mode (A77).
    a) The saved settings won't be changed when you leave the MR mode.
    b) The white balance settings from other shooting modes won't influence  the WB in the MR settings.
    c) The settings in the MR modes will not be kept when changing to other shooting modes.
4. The LCD won't be turned on when the camera is being turned off.
5. Change in the function of the AEL button when using spot metering: "AEL" will no longer be shown when AEL is pressed.
6. Change in the usage of the rear control dial when the shutter button is pressed down half-way: The rear control dial can be used for the the program shift function.
7. The Auto ISO settings can now be changed with the front control dial.


Those were the relatively exact changes that were announced beforehand. These are the vague ones that Sony reported when they actually released the new firmware 1.04:
  1. The number of automatic compensation compliant lenses supported has been expanded.
    • Vario-Sonnar T* DT 16-80mm F3.5-4.5 ZA (SAL1680Z)
    • DT 16-105mm F3.5-5.6 (SAL16105)
  2. Functional improvements.
    • Improvement of response time.
    • Improvement of picture quality.
    • Improvement of usability.
Here are my thoughts on these changes: Any new camera these days will probably have a few bugs when it first hits the market. The Nikon D90 had a much criticized video mode, even though it was the first DSLR to include video capabilities. The A77 is not the first SLT camera from Sony, yet it was supposedly fitted with a new processor at the last minute, which could explain some of the problems in the software. I cannot determine whether they were actually able to fix all the announced bugs. Number 1 may have improved a bit, though I seem to be the only one to report a positive result here. I've read that Number 2 has not been markedly improved. Number 4 seems to have gotten worse (see below). I can't judge whether Number 5 has changed. Number 6 seems to work sometimes; perhaps you have to develop a feel for which dials and buttons to turn and press. 
I did not purchase my A700 until firmware version 4.0 was on it, so I did not have to suffer that camera's teething problems. One of my A700s has recently developed the typical control dial problem, in which one click of the dial can send the settings God-knows-where. But that seems to be a mechanical problem that can be easily - if expensively - repaired.
The improvements which Sony has claimed the new firmware will produce in the A77 are for the most part invisible to me up to now. Not only that, I've had a couple of errors in the past couple of days which I had not seen during the first weeks of camera usage. Once "Camera Err" appeared on the top display panel. My young daughter had reached over and taken a picture and had perhaps pressed another button simultaneously. I honestly don't want to find out how it happened. After turning the camera off and on again, it worked fine. 
Since making the update, I've noticed that when I turn the camera off, it still sometimes displays what is in front of it (obviously only if you leave off the lenscap) until the camera has finally clicked off after the usual 8 seconds. That seems to happen when you turn the camera on and then off without having taken a picture. It is a bit disconcerting.
In addition, I noticed that when you toggle the manual focus to the ON position, the auto focus clicks back on when the power save time is up. This problem can be bypassed by setting the focus mode dial on MF when you are out shooting in MF mode. But toggle is supposed to mean toggle and tickle!
Speaking of the power save mode and tickling, once the camera has gone into the power save mode, the only way to wake it back up is by pressing the shutter (and waiting up to 3 seconds!). On the A700, any of the buttons would wake it up (quickly!).
Another thing that has been bothering me is that the supplied software Picture Motion Browser (great name, eh?) won't import my videos. And in order to be able to edit the AVCHD films, you need this software (or another kind that must be purchased).
Finally, the auto-focus has left me in the lurch several times. With its "TTL phase-detection system with 19 points (11 points cross type)", the camera was said to be very fast to focus. Perhaps this dark time of year has seen me taking more pictures than usual in dark settings - a real challenge for any auto-focus system - but I've been changing to MF more often than I ever did with the A700. I like the new three-zone system because it is much easier to position someone or something in the outer third of the picture without having to focus and then move the camera.


OK - I'm going to leave this post as it is and promise to continue with some of my favorite features and more pictures next time. I hope that the bugs I've described above are all either fixed by Firmware 2.0 or by more fiddling with the camera and getting to know it better.