Sunday, April 15, 2018

Shooting sports with the A7M3


 I've already talked about using the silent shutter for concerts and the caution one must exercise with moving objects or while panning. Here is another good example of when to be careful when choosing the silent shutter.


Yesterday I was standing in the visiting team's bullpen shooting pictures into the glorious afternoon light. I had a great view of the right-handed batters and the infield. I didn't want the players to be distracted by my shooting, so I went silent most of the time.


As you can see in the two photos above, I was panning with the runner, which resulted in everything behind him being slanted in the direction the lens was panning, if the person or object was either not moving, moving slowly or not at all. The first picture has lots of vertical lines which call attention to themselves in a case like this. The second one isn't so bad.
The one below, in contrast, was also taken with the silent electronic shutter, but the ball is moving so slowly that it still appears round and the fielder in red has normal proportions. Using the silent shutter still has two main advantages: it draws less attention to your camera and yourself at a game like this and it doesn't wear down your shutter mechanism.


The light dwindled as the second game continued. I started shooting at 4 pm at around 800 ISO so that I could get some fast shutter speeds (between 1/500 and 1/2,000). I was using the Sony G f4.5-5.6/70-300 at around 200mm most of the time, but this is a lens I like to used stopped down a bit, so I needed the extra ISO. No problem for this camera.
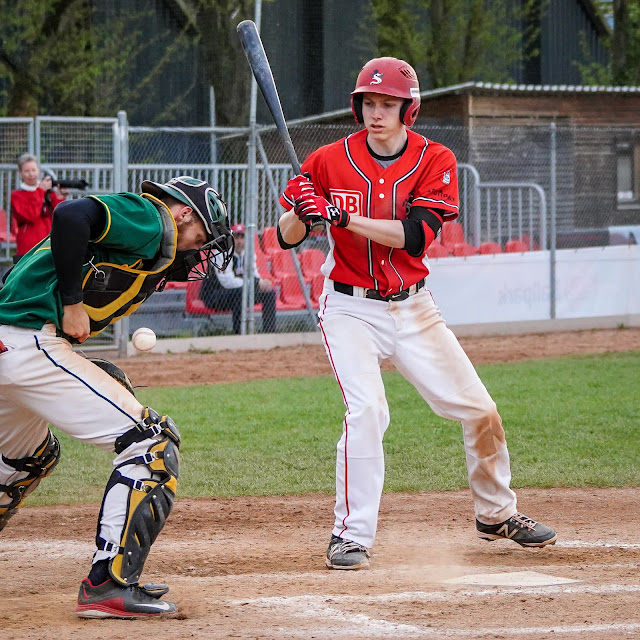
The Hornet's catcher gets hit by a deflected pitch in the right wrist. He moved out to left field to give his injury time to heal.
I took the first half of the pictures in JPEG and, as a test, switched to RAW at the end. I much preferred having the information available in the RAW files when doing the little bit of post-processing which was necessary. The details came out much better in the RAW files, which is why I usually shoot RAW.
Sometimes I switched to APS-C mode for a 1.5x magnification with the touch of a button (more on my preferred settings in the next blog post). I did this mainly because I knew I would neither need nor want huge files; 10MP would be enough. In addition, the files can be saved to the memory card much more quickly this way, not that I had a problem with buffering - I simply didn't take that many in one burst.
I also took the first JPEGs with High ISO Noise Reduction set to "Low" and then the others at "Normal", but didn't notice any difference between the two. Most of the best pictures were taken at around 1/1,000 sec and 1,000 ISO. The aperture stayed at around 5.6-6.3 most of the time, though I did pump it up to 7.1 when I didn't need the extra speed.

This was taken at 250mm x1.5 magnification using the APS-C area of the sensor.
It was nice working with the long lens again. Shooting at 1/1,000 - 1/2,000 sec., I had no problem with camera shake, even though I was effectively shooting without a tripod and at 300-450mm much of the time.
The last thing I played with during the game was the video function, thinking I'd take some frame captures of the action. It just so happens that I got some footage of some of the most exciting parts of the game. Below, you see the opposing pitcher getting hit by the ball. Then he took off for first base but stopped when he saw the ball being thrown home to tag out a runner. The catcher missed the throw but then got the second runner out. A real bit of excitement in what many Germans consider an incomprehensible and boring game! I thought the whole thing was thrilling. There were a lot of hits, good pitching and even an incident of "catcher interference", which I had never heard of!


Below: A slide into home plate captured on video, made into a print with Lightroom. The camera also has a function for doing this. Here is the difference in quality between the two processes:


That's right; no difference. Here is the original 4K video. Enjoy!


Friday, April 13, 2018

Getting accurate exposures with the Sony A7M3

1/1600 sec. at f7.1 and 100 ISO - Easter Sunday sky
Coming from the A700, A77 and A7, I've noticed loads of improvements in the Sony mirrorless segment since October 2011 and December 2013 with this newest camera, the A7M3.

Today I want to touch on three points regarding picture quality. One is especially important if you want to shoot JPEGs. There have been improvements in the white balance menu and settings.
I nearly always have my white balance set to "Automatic" (AWB) because when shooting RAW you usually change the colors a bit while post-processing anyway. And yet Sony realized that shooting inside as much as you would with such a high-ISO monster, you might want to tell the camera's computer exactly what kind of automatic output you prefer. So they have come up with a way to prioritize the tone when shooting under certain lighting conditions. You can have the traditional AWB working; you can prioritize the ambient lighting (creating a warmer color cast); or you can set it to "white", resulting in a cooler tone. I think this is a great tool!

1/30 sec at f6.3 and 4000 ISO - the Freiburger Münster
Furthermore, there are 16 different white balance pre-sets, all of which you can tweak to your heart's content - more red, more green, blue or yellow. When shooting JPEGs, set your white balance to the room's light temperature by pointing the camera at a white piece of paper that is lit with the same ambient lighting as your motif. While your camera is set to the "Custom Setup" function (the last one in the WB menu), take a shot with the center circle pointed at the white paper. Then assign that specific WB to one of the three custom WB settings and you are good to go - until you move into another room or someone turns off the lights and decides candlelight is more romantic!

1/30 sec. at f4 and 1250 ISO - Brass workshop
Second, there are two settings that help you nail the right exposure on the motif in your picture. The first one detects the brightness on faces in your shot when your metering mode is set to "Multi-segment", which is the setting you'll normally want to use. That setting together with the spot metering coordination seem to be very helpful tools when shooting events with tricky lighting situations (bright lights in the picture, backlighting, etc.).

Spot metering is the way digital photographers measure the amount of light needed for a perfect exposure on the chosen motif. No longer do we have to run up to the model or mountain top and hold up a lighting meter to get a good reading of the exposure! This camera can pick a spot and determine how much light is needed for a normal exposure. With the new A7M3 you can coordinate the spot metering point with the focus area even when it is not in the middle of the focus area.

Below is an example of a situation in which I wish I had still been shooting either with both RAW + JPEG or in the spot-metering mode. My cards were filling up, though, and I was taking fast sequences of shots of these birds, so I switched to JPEG only. Unfortunately, the beautiful dark feathers of this hawk were no match for the bright background, which the camera also figured into the "Multi-segment" metering equation.

1/3200 sec. at f4 and 100 ISO
As with the A7, I've had situations where the A7M3 took an absolutely wrong reading of the light and overexposed the scene by a whole stop or two. I never had that with the earlier cameras. However, the electronic viewfinder lets you know immediately that the exposure is wrong. My experience shows that this usually happens after you have just turned on the camera and want to take a picture right away.

So you can set both the exposure and focus areas for the shot you are about to take. Speaking of the focus area, you can set the camera to prioritize focusing on faces when in the wide or zone focus area settings. That's often a good idea when you are shooting people in landscapes, but look what happens when you aren't!

Both photos were taken at 1/640 sec., f5 and 400 ISO - Sea lion feeding time at the Wilhelma
Here is, of course, what I really wanted to focus on:


Finally, for those of you who don't want to guess which exposure might be best in the end, you can set the drive to "Bracket". Now this is nothing new except that Sony has now expanded your bracketing capabilities from three or five images to nine! Together with the 14-bit uncompressed RAW files, this ability to capture a nine-image series of varying exposures will enable you to put together some incredible landscapes! On the other hand, I have seen few situations where I've needed the bracketing. A RAW file is so flexible that you can usually brighten the shadows and tame the highlights to have as good a result as a three-shot, four-stop bracket could give you.

1/500 sec. at f8 and 320 ISO - Vineyards in Rotenberg


Thursday, April 12, 2018

Improvements in Lightroom

1/320 sec. at f5 and 2500 ISO - developed in Lightroom Classic from the Sony ARW file
Just in time for working with the new Sony A7M3, Adobe has updated its Lightroom software, not only to include RAW (Sony's ARW) profiles for that new camera but also to add several new features and a couple of useful tweaks to the interface.

Same shot developed in Lightroom Classic from the in-camera jpeg, which had NR set to "Low".
After waiting for three weeks for Adobe to come up with a RAW converter for the new camera, I was very pleased to see the results of batch processing in the case of this theater production. The lighting was uneven, concentrating on the center of the stage and falling off quickly towards the edges. I took care to expose for neither the brightest nor the darkest faces. Still, there were big differences in the luminosity in the faces, as you can see from these two photos below.

Straight out of the camera RAW

"Auto tone" brought down the highlights, punched the shadows and added vibrance and a bit of saturation.
All in all, this auto tone is a good place to start. Sometimes it'll add clarity to the photo as well, which can add noise, as does the boost to the shadows, so keep your eyes on those sliders.

Now with the newest version of Lightroom, you have the choice to create a common look among all the pictures in a series such as the 400 pictures I took of this performance. If you don't have a set aesthetic with you like to bring to your pictures, you can try one of a number of color or black-and-white presets. Of course, presets have been around a long time, but now you can hover the mouse over thumbnails in the right-hand panel (F8) to see what the image will look like after you apply the preset.

Your camera already has several color presets for jpegs (the bottom three thumbnails above), but Adobe has added new ones, including Vintage, Modern and Artistic. Different strokes for different folks - but also for different sets of photos. There are also 26 B&W presets which basically increase or decrease a certain native color one at a time or in conjunction with another one.
If you know what you are doing, you can create your own presets (color, B&W or otherwise) to increase the speed of your workflow. I use ones I've created for bringing out detail in a blown-out sky, for increasing the detail in a scene, for adding some light to people's faces and for popping a landscape. Plus I have my "Highlights" slider set at -15 because I notice I often want to retrieve some detail from the brightest areas of the photo.

1/60 at f4 and 8000 ISO - developed in LR from the Sony ARW file

This was developed from the in-camera jpeg. It was difficult to achieve a natural looking skin tone because the jpeg (perhaps on account of the high ISO) offered only patchy reds and yellows on her skin.

1/320 sec at f5 and 2500 ISO - here the RAW file has a lot of detail and little noise

The jpeg doesn't have quite the smooth gradations in the colors of the face and it loses some detail on account of the in-camera "Low" noise reduction.

This version was processed in Sony's Image Edge Editor, which created yet again different skin tones.
Another thing that was supposedly improved in this version of Lightroom is the face recognition. I say "supposedly" because, first of all, it seems to have lost all the data I had painstakingly stored in the catalog and, secondly, because Alane looks nothing like a head of salad (see below). Yes, the program may find more faces than it use to, but what good is it if it can't match the faces? I don't use this feature much anyway.


Friday, April 6, 2018

Battery life of the Sony A7M3

My experience after three weeks with the camera

Battery for the A7M3, which lasts seemingly forever!
I'll get right down to one of the biggest improvements in the newest Sony cameras: the battery life has more than doubled. The NP-FZ100, as you may assume from its predecessor's name (NP-FW50), is larger and much stronger than what we had in the earlier models. The Alpha series before the A7 had the big, strong NP-FM500H, which lasted a couple of days in the A700 and nearly a day in the A77, Live View draining the battery more than on the A700.

Battery for the first A7 cameras, which lasts a couple of hours.

Battery for the A100-A77, which lasts a couple of days.
I have three of the smaller batteries for my A7 and usually had to change them after an hour of shooting when the thing went down to around 17%. I never bought the external charger, figuring it was easier to just have a few spares in my pockets.

The relative sizes of the Sony batteries tell you a lot about how long they last.
Last night I started shooting a theater production at 95% on my A7M3. After three hours and nearly 500 shots it was still at over 40%.
When I bought the camera on March 12, I had been fretting that I'd be powerless until replacement batteries become available at the end of April. But so far, so good.

I must add one caveat, though. It takes a long time to fully charge the battery, so plan on recharging over night. If you have to shoot in the afternoon and then again in the evening, a two-hour charge will put you back up into the safe zone so you should get through the evening ok!


Tuesday, April 3, 2018

The Silent Shutter of the Sony A7M3

Take pictures at a concert unobtrusively with the silent shutter function.

One thing I liked most about the Sony A7M3's technical specifications was the silent shutter. At weddings, speeches or at (classical) concerts, having a silent shutter can be a blessing. However, I've discovered two drawbacks to using it so far.

But first the good news!
It is indeed absolutely silent. Unlike the Sony RX100 series and most other point-and-shoot cameras which make a slight sound when capturing a scene, the A7M3 is as silent as your cell phone's camera (assuming you've turned off the annoying fake shutter sound!).
Furthermore, the silent shutter is as fast as the regular physical shutter. That can be tricky if you are used to hearing the shutter click and taking the sound as a cue to stop shooting. If you are in continuous shooting mode (as I was when I took my first shots with the camera), you can easily take 20 pictures before you realize what you've done.

My first photos with the A7M3. Set on silent shutter mode, I didn't realize I had taken 26 photos until two seconds later.
Now the bad news: There are two drawbacks to the silent shutter.
The camera can normally detect flickering fluorescent lights, timing the exposure to moments when the flickering will have less of an impact on the resulting shot. To quote from the help guide: "In continuous shooting mode, the shooting speed may slow down or the interval between each shot may become unequal." So if you are shooting at 1/80-1/250 in an indoor, florescent-lit setting using the silent shutter, you may see stripes on your photos (see below). To avoid this, turn off the silent shutter.
1/200 sec, at f4.5 and ISO 4000 (silent shutter ON)
Interestingly, the stripes are always parallel to the long edge of the frame and have nothing to do with the "light falling from above".

1/250 sec, at f5.0 and ISO 2500 (silent shutter ON)
The second drawback to using the silent shutter function will sound familiar to videographers and to those of you who read about optimal shutter speeds when filming. At a bird show last weekend, I panned the camera as I tracked an owl flying over the viewers' heads from its perch to the falconer's glove. When I viewed the pictures on my computer monitor, I realized that the heads of the audience members were skewed.
The first photo below was taken using the mechanical shutter. The heads of the audience members are all shaped normally. All three pictures below were taken at 1/640 sec.


The next two photos show two things: On the one hand, the A7M3 can track a fast-moving target very well, even against a complex background. On the other hand, the rolling shutter effect distorts things that are not moving at the same speed as the camera's lens.


Heads in the crowd are leaning suspiciously to the right, a result of the rolling shutter effect thanks to the silent (electronic) shutter.
My judgement on the silent shutter is that one should use it in situations where you don't have to move the camera quickly, or where your subject is not moving quickly (see Gordon Laing's video about this phenomenon here) - it is still perfect for speeches and weddings, though, where the lighting is other than florescent!

When you are using the LA-AE4 adapter with Alpha lenses, the shutter causes a click in the adapter because the mirror flips up. So it is then no longer totally silent.

Finally, I was riding atop a tourist bus in Luxemburg recently, shooting the interesting architecture in that city. There I didn't seem to perceive any problems with a rolling shutter, though I was shooting in silent-shutter mode. The camera was probably staying put on one object for just long enough to avoid slanted lines.

1/640 sec. at f6.3 and ISO 200 


1/1250 sec. at f7.1 and ISO 200